Fire-Roasted Eggplant & Red Pepper Dip

Posted by August 6, 2007

Another of my reverse-engineerings, this isn’t Baba Ganoush, as it lacks sesame paste, but it’s still good eatin’:

Fire-Roasted Eggplant and Red Pepper Dip

1 med-large eggplant
1 large red bell pepper

juice and zest of 1 med. lemon
1 med. clove garlic
½ tsp. kosher salt
5 or 6 turns fresh ground black pepper
1/3 C. high quality EVOO

Prepare charcoal kettle grill by lighting about 25 briquettes or the equivalent, plus a few thumb-sized smokewood chunks in a starter chimney. (This is also a great use for reclaimed leftover charcoal from a WSM cook.) Arrange lit coals to one side so that they occupy no more than about 1/3 of the charcoal grate. Adjust bottom vent to about 15% open and top vent to 50%.

Leave whole and brush eggplant and pepper with a little bit of the EVOO or other light vegetable oil. Place both in center of grill, near, but not directly over burning charcoal. Put lid on with vent opposite charcoal. Roast, turning vegetables (fruits, technically) every 15 minutes or so, so that all surfaces get a chance to “face the fire”– until pepper is just charred black and eggplant collapses, about 60 minutes. Remove and allow to cool.

Remove stem and skin from eggplant; stem, skin and seeds from pepper. This should be very easy. On a cutting board, use chef’s knife with a rocking motion, alternately N-S and E-W, to mill both to a coarse, pasty consistency. Place in a 4 to 6 cup bowl.

Use stick blender or food chopper to process lemon juice, zest, garlic, salt, and pepper. Then continue to process as you drizzle in EVOO. Once incorporated, whisk all thoroughly into the eggplant & pepper mixture. Makes about 3 cups. Best served chilled.

Hint: Select good quality eggplant with glossy, dark purple skin. To avoid bitterness– if your selection does not include good quality large eggplants– substitute two smaller fruits of equivalent weight instead.

Quick & Easy: Summer Salad

Posted by May 7, 2007

An easy summer salad with an interesting combination of hearts of romaine, Vidalia onion, creole tomato, fresh basil, black olive and feta cheese. Tossed with a flavorful balsamic vinaigrette dressing, it’s perfect alongside grilled steaks and barbecue meats, or topped with sliced grilled chicken breast for a meal unto itself.

1 large heart of romaine lettuce
1 large creole tomato
8-10 leaves fresh basil
1/2 medium Vidalia onion
1/4 cup sliced black olives
1/4 cup crumbled feta cheese
1/3 cup Newman’s Own© Balsamic Vinaigrette salad dressing

Separate romaine into individual leaves and, after washing and patting dry, split each lengthwise. Then slice crosswise into 1″ wide ribbons. Chop tomato into 16 pieces and remove seeds. Thinly slice onion and chop rings into approximately 1 to 2″ pieces. Roll up and slice basil leaves crosswise into 1/8″ ribbons. Toss all in a large non-reactive bowl with the sliced olives and the balsamic vinaigrette dressing until well-mixed and thoroughly coated. Top with crumbled feta to taste just before serving (about 1 tablespoon for a side salad, twice that for a dinner salad).Recipe makes 4-6 side salads or 2 generous dinner salads.

Quick Pickling


It’s been so hot this summer, the tomato crop is virtually non-existent. On the other hand, the cucumbers are coming one after the other. After trying a few quick pickle recipes– not interested in full-blown canning, really– and not producing anything very remarkable, I found one that I think works really well.

Actually, if I hadn’t offered to trade some of my cucumber bounty to the local organic nursery for some okra, I would have probably never found this recipe, from Martha Stewart, of all places. I made a few minor modifications in the technique, but the ingredients are virtually the same, and it can be easily adapted to other flavoring variations. We’ll start with the okra.

Fresh okra is great, but has a very short harvest window. If you’re growing your own– and it’s not difficult to do so in the right climate– you may want to harvest them at a slightly smaller size than what you usually see at the supermarket in order to guarantee they’ll be edible. You want them about 4-5 inches long, but if you wait even a day or two to try and let them get a little larger, they’ll become tough, fibrous, and essentially useless for anything but the compost bin. Ironically– depending on sun and rainfall conditions– faster-growing pods may be tender at a larger size than slower-growing smaller pods. If you’re not sure about a pod, check the tip– if it’s rubbery and flexible, the pod should be tender and edible. If a pod is at all difficult to slice, it’s probably is too late to use it.

Here’s the (slightly modified) recipe:

Quick Pickled Okra

1 lb. fresh okra, halved lengthwise
6 T. coarse kosher salt
1 medium onion
3 cups white vinegar (5% acidity)
2 cups water
2 T. sugar or granular Splenda
1 T. pickling spices
2 bay leaves
1/4 t. red (cayenne) pepper

Place okra in a non-reactive bowl (glass or plastic) or a plastic collander, and add 3 T. of the salt. Toss to distribute salt evenly. Set aside to drain for 10-15 minutes. Discard any liquid.

Halve onion lengthwise and slice into half-inch thick slices. In a non-reactive saucepan, bring the vinegar, water, onion, spices, cayenne, sugar, the remaining 3 T. salt and the bay leaves to a slow boil. Rinse okra under cool running water and place in a heat-resistant dish (like a 2.5 qt. Pyrex casserole). Pour boiled brine over okra to cover and let cool to room temperature. Chill thoroughly before serving. Pickled okra may be transferred to another suitable container (glass or plastic) for storage in the refrigerator for 2-3 weeks.

This recipe is also good for pickling fresh string beans. If I have some blanched ones hanging around, I add them to the okra batch for a little variety. Strips of fresh red bell pepper or fresh pimiento are also a welcome addition.

The spices can be modified for kosher dill pickles by halving the sugar, adding 1 T. dill weed and a couple cloves of finely chopped fresh garlic to the brine. Slice longer cucumbers in half before cutting them in quarters for spears (sixths or eighths if a larger variety like Straight 8s).

Drip Irrigation

Posted by June 14, 2006

Watering the plants– you gotta do it, no matter what. No water, no garden. It would be nice if rainfall was predictable and regular enough to let nature handle things, but it just ain’t always so. Garden irrigation can be a real pain– if you water manually, you can’t forget to do it, especially during the heat of summer. You don’t want to under or over-water, and different plants have different requirements in order to do their best. One solution is to set up a low-volume or “drip” irrigation system. Using low-pressure tubing and dripper or sprayer heads, you can tailor your system to serve a variety of plants. Plants that need more can be supplied by adjustable drippers or spray heads; plants that need less can be supplied by fixed drippers that supply as little as one gallon per hour.

I found a lot of cool stuff by a manufacturer called Mr. Landscaper© that covers so many bases in low-volume irrigation, it’s hard to fathom what else you could possibly need to handle your garden and plant watering needs.

I did find one thing, however, and it really completes the whole setup. It’s the Orbit Sunmate Automatic Yard Watering System©. Although it’s aimed at high-volume lawn use, it’s wide range of operating pressures– from 10 to 80psi– allows its adaptation to low-volume irrigation quite nicely.The starter kit consists of 4 pieces: a digital multi-station, multi-cycle timer/controller, two electronic station valves, and a 4-outlet brass manifold. Mounting hardware is also supplied. It sells for around $40, which is a great deal, considering the manifold itself costs about $14 if you bought it separately. The controller can run a total of four valves, of which extras can be had for around $15. As a bonus, the controller and valves carry a six-year warranty.

You start by programming the watering duration of each valve or “station”. Additionally, up to four “on” times or “cycles” can be set. Although you can’t stagger the cycles of individual stations, the wide range of watering durations allows the amount of water to each type of outlet to be determined. For example, even though your drippers and sprayers will come on at the same time(s) each day, the drippers connected to one station could be set to run for up to 99 minutes while, at the same time, the sprayers connected to another station could be set to run as little as 1 minute. This allows for a great deal of flexibility.

My current setup features one station which controls the outlets on a length of 1/2″ drip irrigation pipe. A combination of high-flow drippers and spray heads run for 90 minutes twice a day on a raised bed garden containing squash, tomatoes, basil, eggplant, peppers and ginger. Incoming water pressure on this station is controlled by a 25psi regulator in order to prevent the 1/4″ spaghetti lines from blowing off the connectors.

A second station’s outlet is fitted with a reducer/restrictor to feed a long length of 1/4″ spaghetti hose which branches out at its end to a number of 1gph drippers that are mounted on standard 10×20″ seedling trays. This station runs for 7 minutes at a time twice a day– enough to keep about 1/2″ of water on the bottoms of the trays most of the time, even on 90°-plus days. Pots in the trays soak up the water from below as needed. This works great for a variety of uses, including outdoor germination and growing starts until they are ready to be transplanted into the garden. Certainly some herbs could even be left to term in this setup.

I’ve recently purchased two additional station valves to max out the system, and am looking forward to an excuse to utilize them in the near future.

The Orbit system (#62032) and extra valves (#62035) are available at The Home Depot; a full range of Mr. Landscaper products are featured at Lowe’s.

Vermi-Composting

Posted by June 13, 2006

Feel bad every time you look in the refrigerator vegetable crisper bins and find stuff going to rot? There’s a gardening bright side to this dilemma, and it’s called vermi-composting.

What’s that, you ask? It’s actually nothing more than a fancy term for composting using worms. It’s easy, and is probably one of the best things you can do for almost all your plants.

Worm castings, as they are called (conjuring up images of industrious little worms gracefully “casting” their… well… their “worm poo”), are one of the most nutrient-rich forms of organic fertilizer you can use. All you need is a dark-colored, covered-but-vented bin, some kitchen scraps, some moistened shredded up newspaper, and a pound or so of worms.

Not just any worms, mind you, but a couple of particular species that excel at producing this gardener’s black gold. The most common species used are the red wiggler (eisenia foetida) or the so-called European nightcrawler (eisenia hortensis), with the red wiggler being the most popular. The Euros are a bit bigger, and reportedly don’t produce quite as fine a final product, but, if they’re all you can get, should work just as well.

A dark-colored bin is best, since the worms don’t like light. Some ventilation is mandatory, and a method of drainage is also useful. You could use a plastic tote bin, found nearly everywhere, to start vermi-composting. Poke a few dozen holes in the lid with a very small nail– worms can squeeze through holes as small as 1/16 of an inch. Do the same around the perimeter of the bin about 2″ up from the bottom. Place a thick layer– 6 inches or more– of shredded moistened newspaper in the bottom. Not too wet or packed too tight– make it a bit fluffy, and none of the shiny slick stuff– and then add your worms. They will immediately burrow down into the newspaper to get away from the light. Add some vegetable scraps from the kitchen, cover them with a few layers of wetted newspaper (not shredded), and put on the lid. Check under the newspaper every few days to see the worms’ progress, adding more food scraps only as necessary. Add some more moistened torn-up newspaper from time to time, too– they’ll eat it as well.

Don’t have a paper shredder? Let your worms help prevent identity theft by feeding them your last month’s credit card statement– with today’s soy-based inks, your worms will devour it with no problem. Ultimately, your worms will eat half their weight in food every day!

A word about kitchen scraps: Vegetable or fruit peelings, coffee grounds, tea bags, stale cereal are all fine. No meats, fats, bones, or dairy products. Some say no onions or garlic as these have an antibiotic effect on the beneficial microbes in the compost. Others say go light on citrus rinds, as the the worms don’t like the acidity. Your worms will like you more if you chop up their food somewhat before adding it to the bin– it will make their work easier and faster. For tougher scraps, like broccoli stems, go ahead and cook them with the people part of the food, and then pluck out the worms’ share before serving. Also, be ready for a surprise if you put vegetable seeds in your bin– they’ll germinate and sprout like crazy in this dark, moist, fertile environment.

If you can, provide some kind of drain in the bottom of your bin, even if it’s only a hole with a cork in it. Moisture will work its way down and collect in the bottom. Draining it has several benefits. One, you won’t have any drowned worms– unlikely, but possible. Second, the liquid that you drain out isn’t trash, it’s the liquid form of this gardener’s black gold– worm tea. It will be very concentrated– you can add a mere few ounces of it to a gallon of water, and it will still be darker than strong coffee. Give all your plants a treat while you wait for the worms to finish their work. In a ten gallon tote bin, you can even safely add about a quart of water a week to help create more tea without seriously affecting the worms. Just don’t forget to drain it out and use it. If there’s more than you can use up, keep it in a jug with a hole punched in the cap, so the beneficial microbes therein can breath.

Keep your bin in a relatively cool location out of direct sunlight if kept outside. A garage or basement are also good spots. You can even keep it in your kitchen if you want– it has no unpleasant odor whatsoever (unless you perpetually over-feed). At most, your bin should have a subtle, natural, earthy aroma.

Once your compost is ready, it’s time to harvest it. How do you know it’s ready? Like regular compost, you won’t be able to discern any of the materials you put in the bin originally. Nothing will look like paper or kitchen scraps or tea bags at all.

How do you harvest it if it’s still full of worms? Simple. One way is to only feed them on one
side of the bin. The worms will move to that side to feed, leaving the other side virtually worm-free. Another way is to spread out sheets of newspaper on a table. Gently scoop out baseball-sized mounds of compost and place them in rows on the newspaper. Turn on a bright light directly overhead. The worms will move downward in the mounds, and you will be able to brush or scoop off the tops of the mounds a little at a time as they do.

The bin described above will produce plenty of worm compost and worm tea for the average gardener or plant keeper, but, if you prefer a more elegant solution, there are products like the Can-O-Worms.

It has a vented base, a vented cover, and three trays which are used in rotation. You start with a single covered tray sitting in the bottom section, and feed the worms until the compost fills the tray up to a certain level. Then you add another tray, and put some newspaper-covered food in it. The worms move up to the upper tray as they finish composting their food and bedding in the lower tray through hundreds of worm-size holes. The bottom section even has an island for worms who fall through the bottom tray to get out of the collecting liquid and back up into the trays. A handy drain with a valve is provided to dispense worm tea. A starter block of bedding is included– about the size of a large brick, it expands to almost 4 gallons in volume when water is added. The worms, if not available locally, can be mail ordered from worm farms all over the country. Keep them happy, and they will make vermi-compost– and lots more worms– for years to come.

Raised Bed Garden

Posted by April 16, 2006

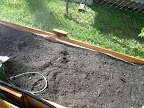
Not abandoning hydroponics by any means, I decided to try to go organic this season with a raised bed. I built mine 2 ft. by 12 ft. to go along the edge of a patio.

Construction, after a bit of design brainstorming, was fairly straightforward, and I was filling it up with soil in about an hour and a half.

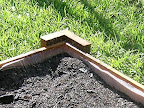
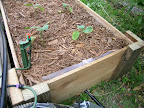
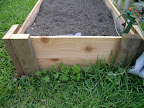
I used 6’x5.5″x5/8″ cedar fenceboards. Corners are pressure treated 12″ 2x4s screwed perpendicular to 12″ 2x6s. Bottoms of 2x6s have 3/8″ holes drilled 5″ deep into which 12″ 3/8″ re-bar is inserted. These will serve to stake the box to the ground. Due to the 12 ft. length, center supports made of 12″ 2x6s, again with the re-bar, tie the 6 ft. sections together in the middle. There’s some very minor bowing at the middle, so I may or may not add something across the top, front to back, to pull it in line. 1-1/4″ galvanized screws attach ends of cedar boards to insides of corners and center connectors, 1″ down from tops of corner pieces so another layer can be stacked on top later if desired. 6 mil plastic sheeting lines the inside walls, but not the bottom– two layers of heavy cardboard are laid out in the bottom to shut out the grass.

The local organic nursery delivered a yard and a half of organic garden mix in a super sack. Really nice stuff, and with the surplus, I’ll have enough to beef up the beds in front of the house and fill another 6×6 foot raised bed . Plus, I have the compost pile going since last summer, and a worm bin that puts out some really good stuff for fertilizer.

DSCN0240.jpgDSCN0242.jpgDSCN243a.jpgDSCN0239.jpg