Braised Lamb Shanks

Posted by April 14, 2009

4 lamb shanks, ½-¾ lb. each
1 medium onion
2 medium size carrots
3 ribs celery
2 cloves garlic, minced
1 C. red wine
1 T. fresh rosemary, chopped
6-8 sprigs fresh thyme tied w/kitchen twine
2 bay leaves
salt
water
light olive oil

Chop onion, carrot, and celery into 1″ pieces. Puree in food processor with garlic until smooth. Do not add any extra liquid. Set aside.

Season lamb shanks liberally with salt. Brown shanks in oil thoroughly on all sides in saute pan. Set aside.

Pre-heat oven to 350°.

Season vegetable puree with salt, and saute, stirring constantly, until most of moisture is removed. Texture, depending on type of pan used, should be either crusty brown but not burned, or like browned ground meat. Reduce heat. Add wine and rosemary, and cook to reduce wine by half.

Place browned shanks in 2-3 qt. round casserole, and pour vegetable mixture over all. Add 3 or 4 cups water so that shanks are three-fourths submerged. Add thyme and bay leaves. Cover and roast for 15 minutes at 350°. Reduce oven temp to 300°, and roast for 2½-3 hours, turning meat once per hour, until lamb is tender. Uncover during last 30 minutes to firm external meat texture, and to further concentrate braising liquid.

Braising liquid should form a gravy ready to use after resting in fat separator.

Serve with roasted root vegetables.

Serves 4.

Chicken Quesadillas

Posted by April 10, 2009

Chicken Quesadillas

4 10″ whole wheat tortillas
12 oz. cooked white meat chicken, diced into 1/2″ cube
1 bag finely shredded Mexican blend cheese
1 medium onion, diced
1 clove garlic, minced
1 large dried ancho chile pepper
1 t. chili powder
1 T. fresh cilantro, chopped fine
butter or margarine
12″ skillet

Using a rubber spatula, paint one side of each tortilla thinly with butter or margarine.

Soak ancho chile in boiling hot water for 10 minutes. Remove stem and seeds, and chop fine.

In a tablespoon of oil, saute onion in skillet until translucent. Add garlic, ancho chile, cilantro, and chili powder. Mix together thoroughly, and set aside.

Heat skillet to medium. Lay one tortilla buttered-side down, and spread 1/4 of chicken, 1/4 of onion mixture on one half, and sprinkle cheese liberally over all. Quickly fold empty side of tortilla over contents, and then carefully flip over with a long spatula. Cook until cheese just melts, flipping again if necessary to avoid burning tortilla. Remove to cutting board and cut in half, cross-wise. Repeat with remaining tortillas and ingredients. Tortillas should be lightly crispy, and filling warm with cheese melted.

Serves 2.

Stuffed Boneless Pork Loin Roast


Stuffed Boneless Pork Loin Roast

1 center cut boneless pork loin roast ~3.5 lb.
1 med. apple (Gala, Granny Smith), diced
1/2 cup diced onion
1 cup pecan halves, chopped
3 slices bacon, cooked crispy, diced
2-3 oz. fresh mushroom slices, chopped
3 cloves garlic, minced
1/2 t. dried rosemary, ground
1 C. breadcrumbs
1/2 C. apple sauce

3 T. butter or margarine
salt & pepper
1 C. Diamond Crystal kosher salt
10-12 ft. kitchen twine

24 hours in advance, brine pork loin roast in kosher salt dissolved in 1 gallon cold water, in a non-reactive container. Refrigerate.

Saute onion in butter until translucent. Add apple, bacon, mushroom, pecans, rosemary and cook until apple just begins to soften. Mix together apple sauce and breadcrumbs. Reduce heat to low and add garlic and breadcrumb/apple sauce mixture, combining thoroughly with other ingredients. Remove stuffing to bowl, and place in freezer or refrigerator to cool to refrigerator temp.

Remove pork loin from brine, rinse and pat dry. Place roast on cutting board fat cap down, noting which side is the more tapered. Orient roast so the tapered side is toward your cutting hand. Using sharp knife, cut lengthwise along the roast with knife blade held flat about 3/4″ above the cutting board. Carefully continue to cut, “unrolling” roast as you go, so that you end up with a mostly flat, rectangular piece of meat about 3/4″ thick overall. Thicker parts may be flattened with a meat mallet. Salt& pepper both sides of meat. If stuffing mix is not yet cold, roll up and return meat to refrigerator until time to continue.

Pre-heat oven to 325°.

Unroll meat onto cutting board and spread stuffing mixture evenly, leaving about a 1/2″ border all around, a little more like 1.5″ on the edge that was originally inner most part of roast. Roll up, being careful not to apply too much pressure and force stuffing out. Stuffed roast should end up fat cap up, and seam side down.

Using butcher’s twine, truss roast at about 1″ intervals. Run excess twine down and back through bottom of each loop, then up to knot at top of first loop, and secure. This sounds harder than it is, but once you do it, it’s quite simple.

Place roast in large pre-heated skillet, and sear on all sides. Place roast seam side down on rack in roasting pan, and cook until meat thermometer reads 140° in center of roast, about 75 minutes. Remove from oven and rest, covered loosely with sheet of foil. Residual heat will continue to cook, and internal temperature should rise to 145-148. This temperature range is considered completely and safely cooked for today’s pork products.

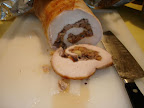
Photo of final product below.

My original intent was to smoke roast on the smoker using apple and pecan woods for smoke flavor. When I went out to light the charcoal, it started to drizzle, and I just wasn’t in the mood to get wet, since my smoker umbrella was ruined in Gustav. I also ended up making french fries out of butternut squash instead of the roasted root vegetables I had originally planned.

This stuffing represents only one of many possible combinations one might use. Part of it was planned (apple, onion, pecan, breadcrumbs); part was just stuff I happened to have on hand (mushrooms, bacon, garlic, apple sauce).

Dsc00458a.jpg

WWW Pizza Dough Redux

Posted by March 29, 2008

WWW = Whole White Wheat

I had come up with a WWW dough that I thought was pretty good a couple years ago, but over time, it has proven a bit fickle. Not in the taste, but in the handling. Even after following my pizza waiter’s suggestion to make it up 24 hours in advance and do a slow ferment in the refrigerator, I was never quite sure, week to week, if I would end up with a large thin pizza or a medium thick one– it depended on what the pizza maker was able to do with it. And it was especially frustrating since I had come to exercise a great degree of precision on the ingredient ratios.

Last week, after the dough was especially uncooperative, our waiter and I had an in-depth talk about what steps I might take to remedy things once and for all. Armed with his tips, I digested everything I could in a day’s time from the Specialty-Grain forum at pizzamaking.com. A member there, named Charbo, seemed to be very familiar with the King Arthur Whole White Wheat flour I had been using, so I adapted a couple of his/her recipes into what appears to have been very successful for the first try at a new dough.

From my readings, I knew I needed to do a few things differently. One, raise the hydration; two, rest before kneading; and three, knead less. I was really afraid that I was going to have a sticky mess with the increased water, but it didn’t turn out to be the case.

This is for two 400 gm. dough balls that each made one 16″ thin-crust pizza skin:

390 gm. King Arthur Whole White Wheat Flour
325 ml. water
60 gm. vital wheat gluten
1 tsp. instant dry yeast
1 tsp. sugar
1/2 rounded tsp. salt (DC kosher)
1 Tbl. olive oil

This is whole white wheat as opposed to red or Graham whole wheat– very important to use the exact brand and type of flour. As you can see, I go by weight, rather than volume on the main ingredients. I mix all the dry together first in the bowl, then add the wet and fold into a ball using a Rubbermaid spatula. Since 1 ml water weighs 1 gram, I just pour in water until the scale reading increases 325 gm. If some of the last of the flour doesn’t pick up into the ball, I add another tablespoon of water, and continue. Cover bowl with a tea towel and rest 15 minutes, allowing flour to get well-hydrated, then take the ball and cloak it for about a minute. Return to bowl for another rest, and then cloak some more. Cut the ball into two equal parts, and briefly cloak each into a smooth ball. Cover loosely and cold ferment in refrigerator 24 hours. Set out at room temp for about an hour before use. This dough will be elastic enough it can be hand-stretched and tossed just like a real pizzeria would. Or form it by hand, or roll it out on the board. This recipe can be halved with no problem once you get a feel for how this dough behaves. This double recipe has a slightly better margin of error for first time users.

What is cloaking? It’s like kneading, but not on a floured board. Hold the piece of dough with both hands, thumbs on top. Pull the top of the dough outward with your thumbs, and tuck it under and pinch together on the bottom with your fingers. Turn the piece 90° and repeat. Repeat a dozen or more times until the surface of the ball becomes smooth. Cloaking allows the strands of protein to align and the dough to become elastic, but without risking it becoming tough from over-kneading in a stand mixer or on a board.

As expected, the dough didn’t rise as much as it did with my old recipe– I was using 1/3 the yeast and giving it only an extra tsp. of sugar– but they had a look and feel to them that told me I was on the right track.

I was disappointed I wasn’t paying closer attention and didn’t see the the pizza maker working the dough, even though we were sitting right across from the big kitchen window. But I gave him a sign like “Well???”, and he smiled broadly and gave a big thumbs up. When the pizza came out, it was clear I was on the road to success, as we had a full 16″ pie with a razor thin crust. The waiter sat down with us and cut himself half a slice to try. We agreed it was good, and the only other thing we should have done was alert the oven tender. He gauges doneness somewhat by edge color, and didn’t recognize our pie since it was so stretched out. As a result, the slightly darker raw dough color led him to pull the pie out about 2 minutes early.

I tweaked the ingredients into the Expanded Pizza Dough Calculator at pizzamaking.com to see what my percentages were:

Flour (100%):390.53 g | 13.78 oz | 0.86 lbs
Water (83.5%): 326.09 g | 11.5 oz | 0.72 lbs
IDY (.8%):3.12 g | 0.11 oz | 0.01 lbs | 1.04 tsp | 0.35 tbsp
Salt (.5%): 1.95 g | 0.07 oz | 0 lbs | 0.57 tsp | 0.19 tbsp
Olive Oil (3.5%):13.67 g | 0.48 oz | 0.03 lbs | 3.04 tsp | 1.01 tbsp
Sugar (1.05%):4.1 g | 0.14 oz | 0.01 lbs | 1.03 tsp | 0.34 tbsp
Vital Wheat Gluten (15.5%): 60.53 g | 2.14 oz | 0.13 lbs | 7.29 tbsp | 0.46 cups
Total (204.85%):800 g | 28.22 oz | 1.76 lbs | TF = N/A
Single Ball: 400 g | 14.11 oz | 0.88 lbs

DSC00315.JPGDSC00318.JPGDSC00322.JPGDSC00323.JPG

Garlic & Herb Artichoke Salad

Posted by October 8, 2007

Mrs. D, shortly after being served a dinner salad recently at a nearby cafe, was brought a small bowl of what we both at first thought was a cup of the soup du jour I had ordered that she had not. Turns out it was a part of her salad the chef neglected to put on top. We tasted it and decided not only was it delicious as-is, but I could probably replicate it, which I did. We like to whip up a batch for those evenings we forego a sit-down supper and just nibble on hummus, olives, cheeses, etc.

Garlic & Herb Artichoke Salad

2 14 oz. cans quartered artichoke hearts
2 T. fresh basil leaves
1 T. fresh garlic, minced
2 T. fresh chives
1/2 t. red pepper flakes
1/4 C. EVOO

Drain artichoke hearts well in collander. Chiffonade the basil leaves by destemming, dividing lengthwise and chopping into 1/8″ ribbons. Similarly, chop chives into 1/8″ pieces. In a 6-cup bowl, add olive oil, basil, garlic, chives and pepper flakes. Mash seasonings a bit with a fork to diffuse flavors into oil. Add artichoke hearts, tossing well to distribute oil and herbs. Improves after overnight refrigeration. Yield: 4 cups.

Texas Caviar Three Ways


Texas Caviar (aka Cowboy Caviar) is easy to make as an appetizer, snack or side dish. And it goes well with BBQ. Here are three variations:

Texas Caviar (courtesy of Joan)

2 cans corn (yellow)
1 can pinto beans
1 can black eyed peas
1 green bell pepper, chopped
1 red bell pepper, chopped
2 bunches green onions, chopped
1 small can chopped green chiles

Drain corn and beans. Mix all in large bowl.

Whisk together 1/3 cup cider vinegar, 1/3 cup olive oil, 1/3 cup sugar. Pour over beans and veggies, tossing to mix. Overnight in fridge. Drain before serving.

I use this one, substituting Splenda for sugar, and also like to add a can of drained garbanzos (chick peas).

———————

Cowboy Caviar (courtesy of Caroline)

1 Can pinto beans
1 Can black eyed peas
1 Can black beans
1 Can white shoe peg corn
1 small onion chopped
1 green pepper chopped
1 small jar of pimentos

Pour all beans etc in a bowl. Boil 1 cup vinegar, 1cup sugar (or sugar substitute) Pour over ingredients in bowl. Marinate all day or over night in fridge. Drain and serve with Frito Scoops for dipping.

———————

Texas Caviar (courtesy of Jules)

1 – 15 oz can blackeyed peas, rinse well
1 – 10 oz can shoe peg corn, rinse
1 – 15oz can black beans
1/2 large onion, chopped
1 green pepper, chopped
2 tomatoes, chopped
1/2 cup fresh parsley or cilantro. chopped
1 tsp garlic powder
6 oz Italian dressing

Mix all ingredients in a large bowl. Cover and refrigerate until ready to serve.